C macro

C macro ## , … and __VA_ARGS__

1. Preprocessor Glue: The ## Operator

预处理连接符:## 操作符

Like the # operator, the ## operator can be used in the replacement section of a function-like macro. Additionally, it can be used in the replacement section of an object-like macro. The ## operator combines two tokens into a single token.

## 将两个符号连接成一个

For example, you could do this:

#define XNAME(n) x ## n

Then the macro:

XNAME(4)

would expand to the following:

x4

Listing 1 uses this and another macro using ## to do a bit of token gluing.

// glue.c – use the ## operator

#include <stdio.h>
#define XNAME(n) x ## n
#define PRINT_XN(n) printf("x" #n " = %d\n", x ## n);

int main(void)
{
	int XNAME(1) = 14; // becomes int x1 = 14;
	int XNAME(2) = 20; // becomes int x2 = 20;

	PRINT_XN(1);        // becomes printf("x1 = %d\n", x1);
	PRINT_XN(2);        // becomes printf("x2 = %d\n", x2);
    return 0;
}

Here’s the output:

x1 = 14
x2 = 20

Note: how the PRINT_XN() macro uses the # operator to combine strings and the ## operator to combine tokens into a new identifier.

2. Variadic Macros: ... and __VA_ARGS__

Some functions, such as printf(), accept a variable number of arguments. The stdvar.h header file, provides tools for creating user-defined functions with a variable number of arguments. And C99 does the same thing for macros.

Although not used in the standard, the word variadic has come into currency to label this facility. (However, the process that has added stringizing and variadic to the C vocabulary has not yet led to labeling functions or macros with a fixed number of arguments as fixadic functions and normadic macros.)

The idea is that the final argument in an argument list for a macro definition can be ellipses (that is, three periods)(...). If so, the predefined macro __VA_ARGS__ can be used in the substitution part to indicate what will be substituted for the ellipses. For example, consider this definition:

#define PR(...) printf(__VA_ARGS__)

Suppose you later invoke the macro like this:

PR("Howdy");
PR("weight = %d, shipping = $%.2f\n", wt, sp);

For the first invocation, __VA_ARGS__ expands to one argument:

"Howdy"

For the second invocation, it expands to three arguments:

"weight = %d, shipping = $%.2f\n", wt, sp

Thus, the resulting code is this:

printf("Howdy");
printf("weight = %d, shipping = $%.2f\n", wt, sp);

Listing 2 shows a slightly more ambitious example that uses string concatenation and the # operator:

// variadic.c – variadic macros

#include <stdio.h>
#include <math.h>

#define PR(X, ...) printf("Message" #X ": " __VA_ARGS__)
int main(void)
{
    double x = 48;
    double y;
    y = sqrt(x);
    PR(1, "x = %g\n", x);
    PR(2, "x = %.2f, y = %.4f\n", x, y);
    return 0;
}

In the first macro call, X has the value 1, so #X becomes "1". That makes the expansion look like this:

(#为参数加双引号。)

print("Message " "1" ": " "x = %g\n", x);

Then the four strings are concatenated, reducing the call to this:

print("Message 1: x = %g\n", x);

Here’s the output:

Message 1: x = 48
Message 2: x = 48.00, y = 6.9282

Don’t forget, the ellipses have to be the last macro argument:

#define WRONG(X, ..., Y) #X #_ _VA_ARGS_ _ #y(这个是错误的例子。)
Configure and Enable NVIDIA GPU in Mesos

Enable NVDIA GPU In Mesos

  1. The configure flags can be used to enable Nvidia GPU support, as well as specify the installation directories of the nvml header and library files if not already installed in standard include/library paths on the system.
    They will also be used to conditionally build support for Nvidia GPUs into Mesos.

  2. In the initial GPU support we will not do auto-discovery of GPUs on an agent. As such, an operator will need to specify a flag on the command line, listing all of the GPUs available on the system.

Configure NVDIA GPU

I ran bootstrap to generate configure.
I then ran:
mkdir build; cd build

../configure --enable-nvidia-gpu-support
../configure --enable-nvidia-gpu-support --with-nvml-include=<relative_path_to_headers>
../configure --enable-nvidia-gpu-support --with-nvml-include=<path_to_headers>
../configure --enable-nvidia-gpu-support --with-nvml-include=<bogus_path>
../configure --enable-nvidia-gpu-support --with-nvml-include=<relative_path_to_lib>
../configure --enable-nvidia-gpu-support --with-nvml-lib=<path_to_lib>
../configure --enable-nvidia-gpu-support --with-nvml-lib=<bogus_path>
../configure --enable-nvidia-gpu-support --with-nvml-include=<bogus_path> --with-nvml-lib=<path_to_lib>
../configure --enable-nvidia-gpu-support --with-nvml-include=<path_to_headers> --with-nvml-lib=<bogus_path>
../configure --enable-nvidia-gpu-support --with-nvml-include=<bogus_path> --with-nvml-lib=<bogus_path>
../configure --enable-nvidia-gpu-support --with-nvml-include=<path_to_headers> --with-nvml-lib=<path_to_lib>

And verified the proper errors / successes in each case (only the last one is a success).
The exact command I ran in the success case for my configuration was:

../configure --enable-nvidia-gpu-support --with-nvml-include=/opt/nvidia-gdk/usr/include --with-nvml-lib=/opt/nvidia-gdk/usr/src/gdk/nvml/lib

The link: https://issues.apache.org/jira/browse/MESOS-4861

Start Agent with Enabling NVIDIA GPU

./bin/mesos-slave.sh --master=127.0.0.1:5050 --resources="gpus:string"
Failed to determine slave resources: Bad type for resource gpus value string type TEXT
	
./bin/mesos-slave.sh --master=127.0.0.1:5050 --resources="gpus:4.9"
Failed to determine slave resources: The gpus resource must specified as an unsigned integer
	
./bin/mesos-slave.sh --master=127.0.0.1:5050 --resources="gpus:4.0"
Failed to determine slave resources: When specifying the gpus resource, you must also specify a list of GPUs via the --nvidia_gpu_devices flag
	
./bin/mesos-slave.sh --master=127.0.0.1:5050 --resources="gpus:4.0" --nvidia_gpu_devices=1,2,3
Failed to determine slave resources: The number of GPUs passed in the --nvidia_gpu_devices flag must match the number of GPUs specified in the gpus resource
	
./bin/mesos-slave.sh --master=127.0.0.1:5050 --resources="gpus:4.0" --nvidia_gpu_devices=1,2,3,4
SUCCESS

NOTE: I didn’t set the –isolation flag here, so the agent actually started up correctly (i.e. it didn’t error out saying that the Nvidia GPU isolator is currently unsupported). This is the correct behaviour, and it properly exercises the code added in this patch.

The link: https://issues.apache.org/jira/browse/MESOS-4865

Added flag to specify available Nvidia GPUs on an agent’s command line

Testing Done

./bin/mesos-slave.sh --master=127.0.0.1:5050 --nvidia_gpu_devices=1,2,string
Failed to load flag 'nvidia_gpu_devices': Failed to load value '1,2,string': Expecting all elements to be unsigned integers

./bin/mesos-slave.sh --master=127.0.0.1:5050 --nvidia_gpu_devices=1,2.0,3 
Failed to load flag 'nvidia_gpu_devices': Failed to load value '1,2,3.0': Expecting all elements to be unsigned integers

./bin/mesos-slave.sh --master=127.0.0.1:5050 --nvidia_gpu_devices=1,2,3
SUCCESS

The link: https://issues.apache.org/jira/browse/MESOS-4864

Replace DC/OS services with Mesos's

This Is A Test for replacing the libs of DC/OS with the Mesos’s.

In this test, we can know the correlation between libs clearly. OK, let us have a try, for funny:

DCOS

1.Example for mesos-slave

$ vim dcos-mesos-slave.service  
					
[Unit]
Description=Mesos Agent: DCOS Mesos Agent Service   
[Service]
Restart=always
StartLimitInterval=0
	RestartSec=5
KillMode=control-group
Delegate=true
LimitNOFILE=infinity
EnvironmentFile=/opt/mesosphere/environment
EnvironmentFile=/opt/mesosphere/etc/mesos-slave-common
EnvironmentFile=-/var/lib/dcos/mesos-slave-common
EnvironmentFile=/var/lib/dcos/mesos-resources
ExecStartPre=/bin/ping -c1 ready.spartan
ExecStartPre=/bin/ping -c1 leader.mesos
ExecStart=/opt/mesosphere/packages/mesos--bcd3532be711ab9e0828c963c07a5a0581ca0757/bin/mesos-slave
EnvironmentFile=-/var/lib/dcos/environment.proxy    

2.In the file, the /opt/mesosphere/etc/mesos-slave-common is very important.

$ vim /opt/mesosphere/etc/mesos-slave-common
			
MESOS_MASTER=zk://leader.mesos:2181/mesos
MESOS_CONTAINERIZERS=docker,mesos
MESOS_LOG_DIR=/var/log/mesos
MESOS_MODULES=file:///opt/mesosphere/etc/mesos-slave-modules.json
MESOS_CONTAINER_LOGGER=org_apache_mesos_LogrotateContainerLogger
MESOS_ISOLATION=cgroups/cpu,cgroups/mem,posix/disk,com_mesosphere_StatsIsolatorModule
MESOS_WORK_DIR=/var/lib/mesos/slave
MESOS_SLAVE_SUBSYSTEMS=cpu,memory
MESOS_EXECUTOR_ENVIRONMENT_VARIABLES=file:///opt/mesosphere/etc/mesos-executor-environment.json
MESOS_EXECUTOR_REGISTRATION_TIMEOUT=10mins
MESOS_CGROUPS_ENABLE_CFS=true
MESOS_CGROUPS_LIMIT_SWAP=false
MESOS_DOCKER_REMOVE_DELAY=1hrs
MESOS_GC_DELAY=2days
MESOS_HOSTNAME_LOOKUP=false
GLOG_drop_log_memory=false
MESOS_HOOKS=com_mesosphere_StatsEnvHook

3.Find the “MESOS_ISOLATION” in /opt/mesosphere/packages/dcos-image--75d4ba1419141c3d791b9eaa90f4483503b17777/ lib/python3.4/site-packages/gen/dcos-config.yaml
In the dcos-config.yaml:

...
MESOS_ISOLATION=
...   

4.Then we find mesos_isolation_modules in
/opt/mesosphere/packages/dcos-image--75d4ba1419141c3d791b9eaa90f4483503b17777/ lib/python3.4/site-packages/gen/calc.py

...
'mesos_isolation_modules': ','.join(__default_isolation_modules + [
                       __stats_isolator_slave_module_name]),
...

5.Then in __default_isolation_modules, the content is below:

__default_isolation_modules = [
	'cgroups/cpu',
    'cgroups/mem',
    'posix/disk',
]  

6.About __stats_isolator_slave_module_name:

...
__stats_isolator_slave_module_name = 'com_mesosphere_StatsIsolatorModule'
...   

7.And __stats_isolator_slave_module_name is in _stats_slave_module:

__stats_slave_module = {
    'file': '/opt/mesosphere/lib/libstats-slave.so',
    'modules': [{
        'name': __stats_isolator_slave_module_name,
    }, {
        'name': __stats_hook_slave_module_name,
        'parameters': [
            {'key': 'dest_host', 'value': 'metrics.marathon.mesos'},
            {'key': 'dest_port', 'value': '8125'},
            {'key': 'dest_refresh_seconds', 'value': '60'},
			{'key': 'listen_host', 'value': '127.0.0.1'},
			{'key': 'listen_port_mode', 'value': 'ephemeral'},
	        {'key': 'annotation_mode', 'value': 'key_prefix'},
	        {'key': 'chunking', 'value': 'true'},
            {'key': 'chunk_size_bytes', 'value': '512'},
        ]
    }]
}

8.And where is the __stats_slave_module?

entry { 
...
'mesos_slave_modules_json': calculate_mesos_slave_modules_json(
        	            __default_mesos_slave_modules + [__stats_slave_module]),
...
	}

9.The file __default_mesos_slave_modules:

__default_mesos_slave_modules = [
	   __logrotate_slave_module,
]

10.The contents of __logrotate_slave_module:

__logrotate_slave_module = {
		 'file': '/opt/mesosphere/lib/liblogrotate_container_logger.so',
		 'modules': [{
		 'name': __logrotate_slave_module_name,
		 'parameters': [
		  {'key': 'launcher_dir', 'value': '/opt/mesosphere/active/mesos/libexec/mesos/'},
		  {'key': 'max_stdout_size', 'value': '2MB'},
		  {'key': 'logrotate_stdout_options', 'value': 'rotate 9'},
		  {'key': 'max_stderr_size', 'value': '2MB'},
		  {'key': 'logrotate_stderr_options', 'value': 'rotate 9'},
	 	]
	}]
}

11.Where is the mesos_slave_modules_json: /opt/mesosphere/packages/dcos-image--75d4ba1419141c3d791b9eaa90f4483503b17777/ lib/python3.4/site-packages/gen/dcos-config.yaml

package {
...
- path: /etc/mesos-slave-modules.json
content: |

...
}

Mesos

1../bin/mesos-slave.sh

. /root/repo/mesos/build/bin/mesos-agent-flags.sh
exec /root/repo/mesos/build/src/mesos-agent "${@}"

NOTE:
OK, when replace the libs of DC/OS with the Mesos’s, it doesn’t work! And when roll back to the default configure of DC/OS, it still does not work.
So, I guess, something in libs of DC/OS have changed. I should find another way to enable GPUs in DC/OS.
And I know that it is not only the libs needed to modify, but also the interface, the stuffs of 3th-party components, and so on.
BTW, THIS IS A TEST!

Bash Script

Bash Script

Scripting Security

All of the Script are beginning with content below:

#!bin/bash
set -o nounset
set -o errexit  

To do this for avoiding two common problem:

  • Referencing undefined variables.
  • Ignore failing to execute cmds.

Note:
At errexit mode, although it can catch the errors effectively, it can’t capture all of the failed cmd. In some cases, some of the failed cmd is unable to detect.

Use [[ ]] Replace [ ]

Use [[ ]] can avoid problems such as the file name extension of the exception. And it can bring a lot of improvement in grammar and also adds new features.

The variable and explanation

||  #logic `or`(only used in double [])
&&  #logic `and`(only used in double [])
<   #character string compare
-lt #digital compare
=   #character string eq
==  #by globbing string comparison(used only in double square brackets)
=~  #use regular expressions to perform string comparisons(used only in double square brackets)
-n  #retval NULL string
-z  #NULL character
-eq #digital equal
-ne #digital unequal

Regular Expression / Globbing

Example:

t="abc123"
[[ "$t" == abc* ]]         # true (globbing comparison)
[[ "$t" == "abc*" ]]       # false (literal comparison)
[[ "$t" =~ [abc]+[123]+ ]] # true (regular expression comparison)
[[ "$t" =~ "abc*" ]]       # false (literal comparison)

String comparison can also be used as Globbing to the case statement:

case $t in
abc*)  <action> ;;
esac  

String Operations

1.Basic Operations

f="path1/path2/file.ext"  

len="${#f}"        # = 20 (length of a string) 
	
# slicing operation: ${<var>:<start>} or ${<var>:<start>:<length>}
slice1="${f:6}"    # = "path2/file.ext"
slice2="${f:6:5}"  # = "path2"
slice3="${f: -8}"  # = "file.ext"(Note:front of "-" is a blank space)
pos=6
len=5
slice4="${f:${pos}:${len}}" # = "path2"

2.Replacement Operation

f="path1/path2/file.ext"  
	
single_subst="${f/path?/x}"   # = "x/path2/file.ext"
global_subst="${f//path?/x}"  # = "x/x/file.ext" 
	
# splitting strings
readonly DIR_SEP="/"
array=(${f//${DIR_SEP}/ })
second_dir="${arrray[1]}"     # = path2

3.Remove the head or tail

f="path1/path2/file.ext" 
	
# remove the head of the string.
extension="${f#*.}"  # = "ext" 
	
# remove the head of string through greedy matching.
filename="${f##*/}"  # = "file.ext" 
	
# remove the tail of the string.
dirname="${f%/*}"    # = "path1/path2" 

# remove the tail of string through greedy matching.
root="${f%%/*}"      # = "path1"   

Build-in Variable

The variable and explanation

$0 #the name of script  
$n #the n-th variable of deliveriing to script
$$ #the PID of script
$! #the PID of previous executed-CMD  
$? #the state of the previous CMD exited
$# #the number of variable dliveried to script
$@ #the all of variable dliveried to script
$* #the all of variable of dliveried to script(as a character string)   

Debug

1.Grammar Check to the Script

bash -n myscript.sh

2.Trace the executing cmd in Script

bash -v myscript.sh 

3.Trace the executing cmd and extend the information in Script

bash -x myscript.sh

Note:
You can use set -o verbose and set -o xtrace in front of the script to assign -v -x eternally.

When do you not need to use script

  • The script is too long, up to hundreds of lines.
  • You need more complex than an array data structure.
  • Escape with complex problems.
  • Too much character string to dispose.
  • Don’t need to interact with other applications through pipe.
  • Worry about performance.
The Framework Of Mesos

Note:This is a Beginning for Understanding the Framework of Mesos.

Mesos Frameworks

Frameworks

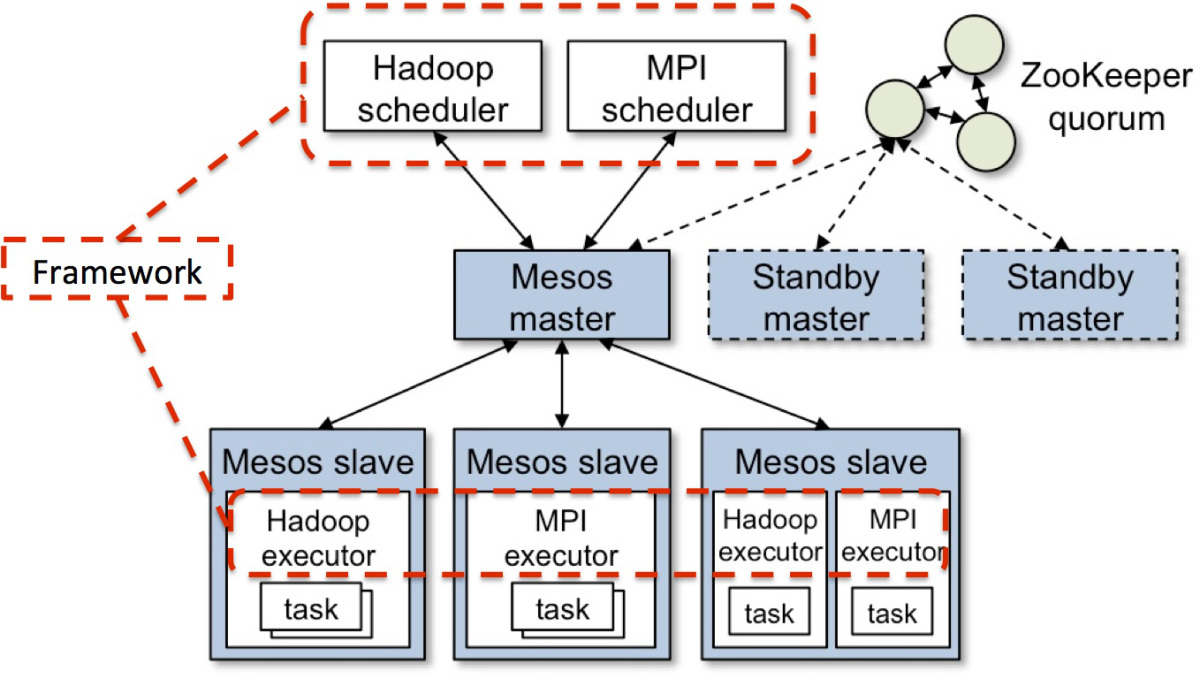
The Architecture of Mesos:
mesos-architecture.jpg
Apache Mesos is offen explained as being a kernel for data-centre, meaning that cluster resources (CPU, GPU, RAM, Disk…) are tracked ad offered to “user space” programs(i.e Frameworks) to do computations on the cluster. From the above figure , we have one elected master that track resources on slaves and offer these resources to frameworks. Frameworks can take the offers and use this to launch a task on the slaves. These tasks run on an executor usually the built-in. Command Executor, that manages the task for us on the machine. So the framwork itself is actually a type of scheduler.

Register The Framework

One of the first things that a Mesos Framework should do is to register itself with the elected Mesos master so that it can start receiving resource offers. These offers then need to end up in our scheduler implementation. In Java we can use the MesosSchdulerDriver to take care off this wiring for us. we set our new MesosSchedulerDriver up by passing in a reference to our scheduler and by telling it everything it needs to know to communicate and register with the Mesos master.

If we want wo develop our own Framework, the Library and the Interface below need to be included.
- The Scheduler Library Of Mesos
SchedulerLibraryOfMesos.png

- The Executor Library Of Mesos
ExecutorLibraryOfMesos.png

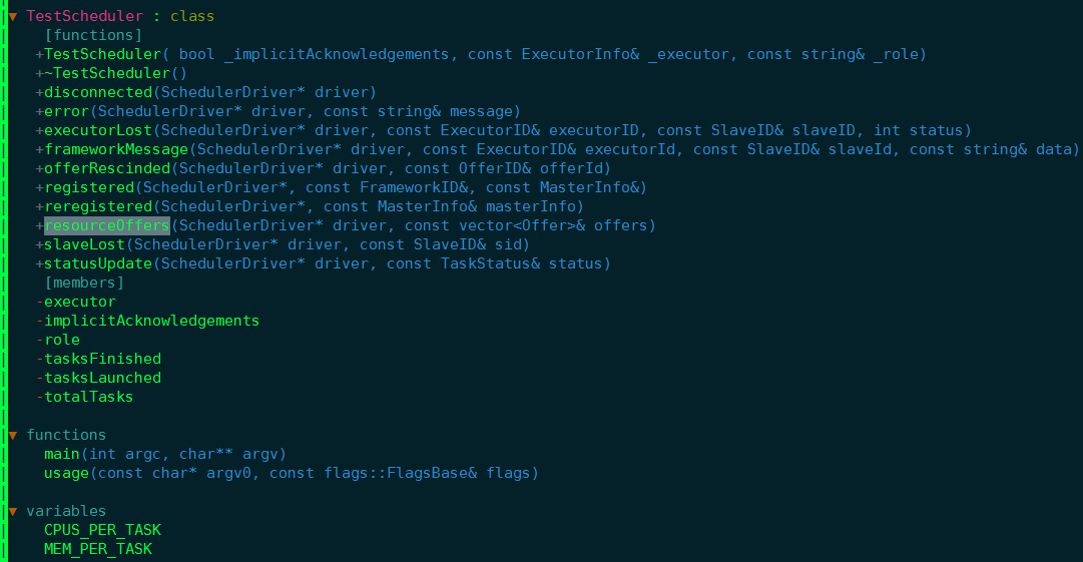
- The FrameworkScheduler Interface
SchedulerInterface.png

- The FrameworkExecutor Interface
ExecutorInterface.png

- Run FrameworkScheduler
runFramework.png

- Run FrameworkExecutor
runExecutor.png

The first thing a Framework insterting into Mesos is to prepare two stuffs:

- One is the Scheduler of Framework FrameworkScheduler, a core class to schedule the resources achieved from Mesos-Master and execute the tasks that match the resources. FrameworkScheduler insteract with Mesos-Master trough MesosSchedulerDriver.

- The other is the Executor of Framework Execute the tasks that Frameworks deploy on Mesos-Slave.

When we create a FrameworkScheduler instance, with the (FrameworkID, MasterID, FrameworkScheduler) create SchedulerDriver instance. The instance of SchedulerDriver use for two things:

- Manage the FrameworkScheduler all the life-cycle, include start, stop, wait…